sudo auth with Touch ID and tmux
If you want iTerm to allow sudo authentication to work with Touch ID, follow these steps.
- First, with iTerm you must Turn off
Prefs > Advanced > Allow sessions to survive logging out and back in - Next, run:
brew install pam-reattach - Run the following command to find the path to
pam_reattach.so:find -L /usr/ /opt/ -name "pam_reattach.so" 2>/dev/null | grep -i "homebrew/lib/pam/"
- Then you need to
sudo nano /etc/pam.d/sudoand add the 2 highlighted lines below. Note the homebrew install pam_reattach.so path you retrieved in the previous step. You’ll need the full path because it is not in PATH by default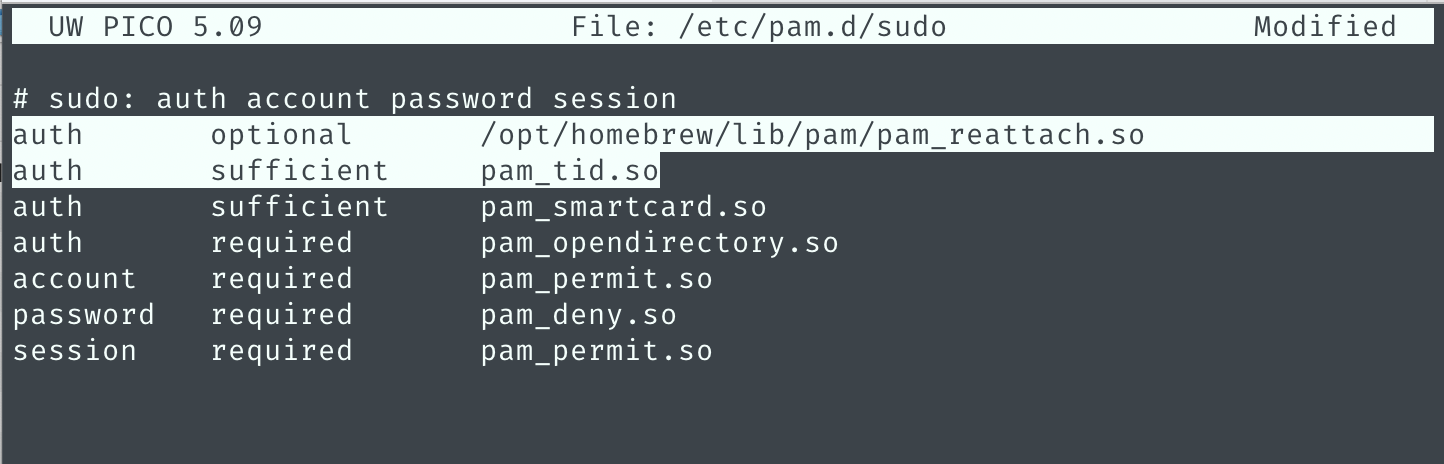
- Save the file and exit.
- Kill all tmux sessions and restart iTerm2.
- Now when you run
sudo lsyou should be able to use TouchID, instead of typing your password, to authenticate
Finally, fix up iTerm2 so you can use option + arrow to jump between words in the terminal:
https://superuser.com/questions/427163/altarrow-moving-between-words-in-zsh-and-iterm2
- In iTerm2, go to Preferences > Profile > Keys
- Under the list of Key Mappings there is a box to add/remove or load Presets (combo box)
- Select the
Natural Text Editingoption in the Presets drop down.
Recreating a Docker container breakout with nsjail
Way back in June 2014, Docker published a blog post detailing a security flaw that allowed an attacker to break out of a Docker container and access files on the host file-system. This meant that a user running code within a Docker container could read sensitive files in privileged locations on the host, such as /etc/shadow.
This flaw existed only in Docker versions earlier than 1.0.
A PoC exploit called shocker was made available, and we will use it today, along with nsjail, to demonstrate this vulnerability.
Jen Andre has written a thorough analysis of how this exploit works.
Today’s containers are built using important Linux components such as kernel namespaces, root capabilities, control groups (cgroups), seccomp system-call filtering, pivot_root, and on occasion containers will also use Mandatory Access Control implementations such as AppArmor or SELinux.
General outline:
- I recreated this on Ubuntu 18.04 beta (kernel v4.15.0-10)
- Download and install nsjail
- Download and compile the shocker exploit
- execute
touch /tmp/.dockeriniton your host system (shocker will look for this file) - compile shocker:
gcc shocker.c -o /tmp/shocker
- execute
- OPTIONAL: Download amicontained and copy it to /tmp
- Launch nsjail
sudo nsjail --chroot /tmp -R /bin -R /usr/bin -R /lib64 -R /lib/x86_64-linux-gnu/ --cap CAP_DAC_READ_SEARCH --disable_clone_newuser -- /bin/bash -i
- Optionally run
/amicontained(from within the nsjail container) and review the output - From within the jailed bash shell, run the exploit:
/shocker - Done. You should now see the contents of the host’s
/etc/shadowfile
Steps 1-4 should be straightforward, but lets talk about the nsjail command:
sudo nsjail \
  --chroot /tmp \
  -R /bin \
  -R /usr/bin \
  -R /lib64 \
  -R /lib/x86_64-linux-gnu \
  --cap CAP_DAC_READ_SEARCH \
  --disable_clone_newuser \
  -- /bin/bash -i
--chroot /tmpsimply sets the root directory of the container as the host’s/tmpdirectory- The
-Rswitches instruct nsjail to mount the specified directories within the container as read-only. These are necessary for running/bin/bashand utilities such asidinside the container --cap CAP_DAC_READ_SEARCHinstructs nsjail to enable this capability for our container, and is crucial for this exploit to work. The documentation for this capability says:
CAP_DAC_READ_SEARCH – Bypass file read permission checks and directory read and execute permission checks; invoke open_by_handle_at(2); use the linkat(2) AT_EMPTY_PATH flag to create a link to a file referred to by a file descriptor.
--disable_clone_newuserdisables the User namespace. Without disabling the User namespace, the shocker PoC exploit simply won’t work. So what does a User namespace do? see below:- For containers whose processes must run as the root user within the container, you can re-map this user to a less-privileged user on the host. The mapped user is assigned a range of UIDs which function within the namespace as normal UIDs from 0 to 65536, but have no privileges on the host machine itself. reference
- Without container support for the User namespace, it means that if you are root in the container, you are root on the host. The User namespace changes that and allows us to let the container user run as root within the container only, while being mapped to a lower privileged UID on the host.
/bin/bash -i– run an interactive bash shell within the container
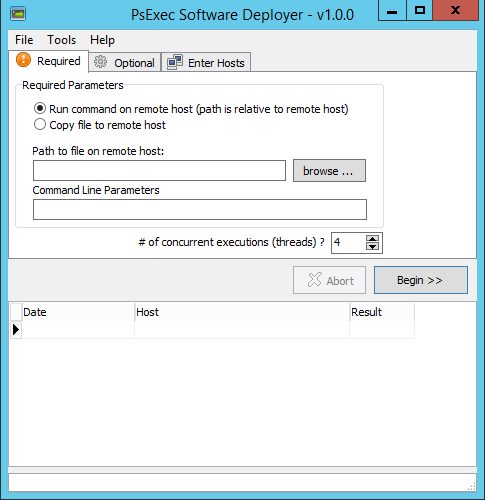
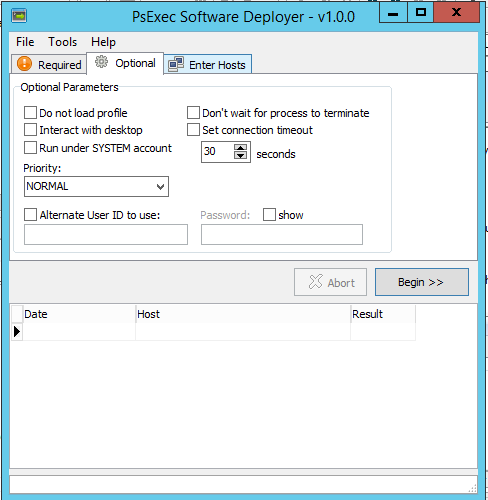
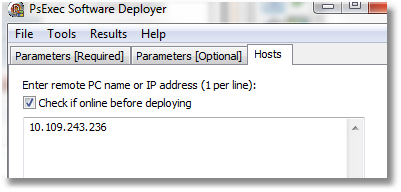
PsExec Software Deployer
About 5 years ago I wrote a GUI wrapper around PsExec to assist me with using psexec to:
- Copy and execute software installations on a number of remote computers
- Run a command on a remote system and retrieve its output
- Log all activity and retrieved output in a grid view that can be exported to XLS, HTML, XML, or plain text.
When I needed to run complex scripts that depended on a number of files, I would create a self-extracting EXE (using this tool) and use this PsExec Software Deployer to copy the file and run it on remote systems.
I wrote it just for my own use, but I think others might get some use out of it as well so I am open-sourcing it. I wrote it in Delphi and as such it has no external dependencies and is a single EXE (although requires psexec.exe to be downloaded).
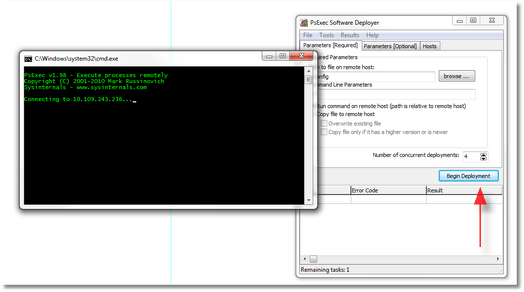
This tool is written to be multi-threaded, so multiple deployments can occur concurrently, which greatly sped up my ability to deploy software or retrieve data from machines.
The source is available here: https://github.com/MicksMix/psexec-software-deployer
If you just want the binary, it is here: https://github.com/MicksMix/psexec-software-deployer/blob/master/bin/debug/PsExecGui.exe
Screenshots:
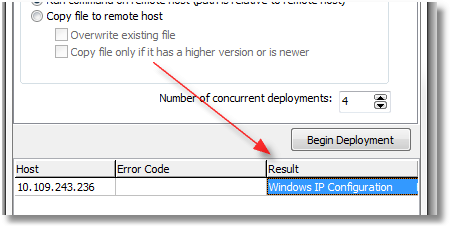
Here’s an example using the tool’s ability to run a command on a remote system and capture its output:
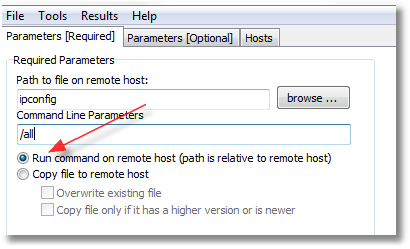
Double-clicking on the cell the red arrow is pointing to will display the full text from the command. Also, you can simply save the grid to a file (HTML, XLS, XML, or plain text).
Bitwise operations with Python
http://blog.didierstevens.com/programs/translate/
Translate.py is a Python script to perform bitwise operations on files (like XOR, ROL/ROR, …). You
specify the bitwise operation to perform as a Python expression, and pass it as a command-line argument.
translate.py malware malware.decoded ‘byte ^ 0x10’


Direct download: https://didierstevens.com/files/software/translate_v2_0_0.zip
Removing old, unused Linux kernel headers/modules from Ubuntu
Taken from here: https://ubuntugenius.wordpress.com/2011/01/08/ubuntu-cleanup-how-to-remove-all-unused-linux-kernel-headers-images-and-modules/
When I’m cleaning up disk space on Ubuntu, I like to start here. This command will clean up old Linux kernels/headers:
dpkg -l 'linux-*' | sed '/^ii/!d;/'"$(uname -r | sed "s/\(.*\)-\([^0-9]\+\)/\1/")"'/d;s/^[^ ]* [^ ]* \([^ ]*\).*/\1/;/[0-9]/!d' | xargs sudo apt-get -y purge
Fix PuTTY Colors
Do you find the default colors within PuTTY to be often too dark to read?

image source: http://www.darkrune.org/blog/?p=213
With a couple snippets of PowerShell you can update all your existing saved PuTTY sessions to use a more readable shade of blue.
Get-ItemProperty -Path HKCU:\Software\SimonTatham\PuTTY\Sessions\* | foreach-object {set-itemproperty -path $_.pspath -name Colour14 -value "38,139,210"}
Get-ItemProperty -Path HKCU:\Software\SimonTatham\PuTTY\Sessions\* | foreach-object {set-itemproperty -path $_.pspath -name Colour15 -value "38,139,210"}
And now it’s much easier to read:

If you prefer the very nice ZenBurn theme, run these PowerShell commands and all your saved PuTTY session (including the Default) will be updated to use it:

$Theme_ZenBurn=@{
	"Colour0"="220,220,204";
	"Colour1"="220,220,204";
	"Colour2"="58,58,58";
	"Colour3"="58,58,58";
	"Colour4"="0,13,24";
	"Colour5"="143,175,159";
	"Colour6"="0,0,0";
	"Colour7"="85,85,85";
	"Colour8"="215,135,135";
	"Colour9"="215,135,135";
	"Colour10"="160,192,160";
	"Colour11"="160,192,160";
	"Colour12"="255,255,135";
	"Colour13"="255,255,135";
	"Colour14"="101,121,142";
	"Colour15"="101,121,142";
	"Colour16"="241,140,150";
	"Colour17"="241,140,150";
	"Colour18"="140,208,211";
	"Colour19"="140,208,211";
	"Colour20"="255,255,255";
	"Colour21"="255,255,255";
}

### Pick a theme
$NewPuttyColors = $Theme_ZenBurn

foreach ($setting in $NewPuttyColors.GetEnumerator()) {
    Write-Host "$($setting.Name): $($setting.Value)"
    Get-ItemProperty -Path HKCU:\Software\SimonTatham\PuTTY\Sessions\* | foreach-object {set-itemproperty -path $_.pspath -name $setting.Name -value $setting.Value}
}

Write-Host "Completed applying new PuTTY color profile to all existing sessions."
I personally prefer the Solarized theme. Run these PowerShell commands to change all your current (and Default) sessions to use this theme:

image source: http://lkhill.com/reminder-solarized-for-better-terminals/
$Theme_Solarized=@{
	"Colour0"="131,148,150";
	"Colour1"="147,161,161";
	"Colour2"="0,43,54";
	"Colour3"="7,54,66";
	"Colour4"="0,43,54";
	"Colour5"="238,232,213";
	"Colour6"="7,54,66";
	"Colour7"="0,43,54";
	"Colour8"="220,50,47";
	"Colour9"="203,75,22";
	"Colour10"="133,153,0";
	"Colour11"="88,110,117";
	"Colour12"="181,137,0";
	"Colour13"="101,123,131";
	"Colour14"="38,139,210";
	"Colour15"="38,139,210";
	"Colour16"="211,54,130";
	"Colour17"="108,113,196";
	"Colour18"="42,161,152";
	"Colour19"="147,161,161";
	"Colour20"="238,232,213";
	"Colour21"="253,246,227";
}

### Pick a theme
$NewPuttyColors = $Theme_Solarized

foreach ($setting in $NewPuttyColors.GetEnumerator()) {
    Write-Host "$($setting.Name): $($setting.Value)"
    Get-ItemProperty -Path HKCU:\Software\SimonTatham\PuTTY\Sessions\* | foreach-object {set-itemproperty -path $_.pspath -name $setting.Name -value $setting.Value}
}

Write-Host "Completed applying new PuTTY color profile to all existing sessions."
Python pip and vcvarsall on Windows
Linking to this SO answer and re-posting it here, as I seem to search for it every few weeks or so:
For Windows installations:
While running setup.py for package installations, Python 2.7 searches for an installed Visual Studio 2008. You can trick Python to use a newer Visual Studio by setting the correct path in VS90COMNTOOLSenvironment variable before calling setup.py.
Execute the following command based on the version of Visual Studio installed:
- Visual Studio 2010 (VS10):
SET VS90COMNTOOLS=%VS100COMNTOOLS% - Visual Studio 2012 (VS11):
SET VS90COMNTOOLS=%VS110COMNTOOLS% - Visual Studio 2013 (VS12):
SET VS90COMNTOOLS=%VS120COMNTOOLS%
FSExploitMe and Exploit-Exercises
If you are interested in learning about ActiveX exploitation, security researcher/consultant/professor Brad Antoniewicz has created FSExploitMe for just that purpose.
You’ll want a copy of Internet Explorer 8 to get the most out of it, but fortunately you can get a VM running IE8 for *free* from Microsoft.
And if you are interested in getting deeper into Linux exploitation, exploit-exercises.com has pre-built VM’s with capture-the-flag style levels and challenges for each level. It also has challenges for beginners to expert and is designed to teach:
[…]about a variety of computer security issues such as privilege escalation, vulnerability analysis, exploit development, debugging, reverse engineering, and general cyber security issues.
Visualizing Garbage Collection
Visual guide to understanding garbage collection algorithms!
Data::Dumper formatting
I look this up about every couple weeks, so I’m posting it here for posterity. In order to nicely format Data::Dumper output…
I almost always set
$Data::Dumper::Indent = 1;
$Data::Dumper::Sortkeys = 1;
with
Data::Dumper. The first statement makes the output more compact and much more readable when your data structure is several levels deep. The second statement makes it easier to scan the output and quickly find the keys you are most interested in.If the data structure contains binary data or embedded tabs/newlines, also consider
$Data::Dumper::Useqq = 1;which will output a suitable readable representation for that data.
Much more in the perldoc.
